Thursday, February 24, 2011

Chunky Jewel Cuff Bracelet

After making the bracelets I featured on my last post, I made another bracelet... a cuff bracelet... for me again :)
It turned out a little chunky for my taste but I was happy I was finally able to use that wire cuff bracelet frame I bought a loooooong time ago. You see back when I was running an online store selling accessories, I bought a couple of wire bracelet cuff frames because I wanted to try making wire jewelry. It turned out to be too meticulous for me so I abandoned the idea. Last weekend I saw the cuff frame again and decided to use it. I didn't want to use wire... that didn't work out too well for me last time. Luckily, since then, I have discovered felt and glue! Yey!!

For this project I used:
  • Wire cuff bracelet frame
  • 5 plastic gems (torn out of their setting from an old elastic bangle)
  • 2 different sizes of pearl beads.
  • Felt (not shown in the photo)
  • Glue gun.
Step 1. I glued felt on the outer part of the cuff bracelet frame.


Step 2. To make the gem embellishments, I glued a plastic gem to a piece of felt and then glued small pearls around it and cut off the excess felt.

Hmmm... pretty! I think these would also look great as a brooch or pendant.

Repeat Step 2 until you have enough embellishment to cover the cuff bracelet frame. I made 5 for my cuff.

Step 3. Glue one of the embellishments to the center of the cuff bracelet frame. Once you have established the center, you can glue the other pearls and embellishment on the cuff bracelet frame until you cover entire frame.

Ta-dah!

I have one more cuff frame in my stash...

I will need a new design for this. Stay tuned!

Wednesday, February 23, 2011

Lounge Wear to 'Layered-Look' Shirt Refashion

My mom bought this... uh... I have no idea what it's called... lounge wear??? (Here in the Philippines... we just call it by the unglamorous term  'Daster' which translates loosely to 'house dress' haha).
It's American size XL... which means it's too big for her and... yey!! too big for me too!!! (I was just happy I don't fit in an XL, haha). Anyway... I really don't wear stuff like these, except for when I was pregnant and had to stay at home most of the time. So I did a little cutting here, and a little sewing there... and came up with this:
Now this is something I can wear.

Here are the details of my 'little cutting here... and little sewing there...":

First I took a white shirt whose fit I liked and laid the dress over it.
I just needed to see how much of the white shirt I needed. I live in a tropical country so layering like this is not practical. Based on this, I saw that I only needed the upper part of the shirt to about an inch below the armpits.

I cut the shirt.
It's actually just a promo shirt from my bro-in-law's cargo company so I don't really use the shirt much.
I pulled the dress over the part of the shirt I needed and secured them with pins.
My pin cushion is making a guest appearance on this post :)
Using a sewing machine, I sewed along the edges of the dress, front and back, to attach the shirt to the dress. My sewing was a little uneven along one side so I decided to hide the stitches using a rolled fabric flower using blue t-shirt scraps :)


This picture was taken with me facing a mirror so the flower appears on the left shoulder (reflection). It's actually sewn on the right shoulder.

This project is linked up to the following link parties:

Tuesday, February 22, 2011

Toddler Shoe Refashion

Remember the shoe refashion I posted last week? I was going through Andrea's stuff and I noticed that one of her shoes can do a little bit of refashioning:
Missing one of the rubber flowers she loves fiddling with.. she must have pulled them off. Tsk tsk tsk...
I removed the other flower and made bows using hot pink felt, like the ones I made for my espadrilles. I used a glue gun to attach the bows to her shoes (I don't have to make them changeable since she will be growing out of those shoes in about a month).


There... now Andrea and I can be all matchy-matchy when we wear our shoes :)

Bracelets! Bracelets! Bracelets!

It's been a while since I made bracelets. I don't really wear them much because I work with computers and I hate it when my bracelet hits the top of my desk when I use the mouse. But last Friday, I was back reading posts from ~Ruffles And Stuff~ and saw this post about Stella & Dot. I love the Soiree Pave Bracelets!

Soiree Pave Bracelet in Turquoise
I checked the online store and they were $34 each. They look easy enough to do, and I still have a  lot of semi-precious stones from when I had my online store, so I decided to make them last weekend.

Using Rose Quarts, Jade and Black Onyx beads

I got a little carried away when I saw how pretty they looked that I ended up making several. I didn't have the same crystal studded silver bead for the center so I used some Czech fire-polished glass beads and crystal-studded silver spacers instead.

Yellow jade bead bracelet.
Using coral beads.
Using Amethyst beads... finally! I was able to use them. I bought them a long time ago but never really found any use for them since I don't like the color much.
Using Moonstone beads.
The last one, I have no idea what the center bead is called. I wanted to make the moonstone bracelet using the same design as the others but it just doesn't seem to look good with the Czech glass bead.

Anyway... I still have plenty of jewelry-making materials so you can look forward to more jewelry posts :)
This is my pearls drawer... I have a separate drawer for glass beads, a separate drawer for metal findings, a separate drawer for semi-precious stones and crystals... and... yeah... I do tend to get carried away.
I linked up this project to the following amazing blogs:

Monday, February 21, 2011

Dainty Fabric Flower

My sister is into large fabric flowers lately to dress up the usual pony tail. I've been making them for her but last weekend, I was stuck with no new idea. I have tried all the tutorials on fabric flowers that I like. So I decided to 'wing' it and this is what I ended up with:

Not bad huh?
I used a combination of techniques I learned from making other fabric flowers. For this flower I used:
- 1 strip of lining fabric with beige damask print, 2.5 inches wide, and around 12 inches long
- 1 strip of the same fabric, 1.5 inches wide and 8 inches 10 inches long
- button for the flower center
- a felt circle in a coordinating color, 2 inches in diameter
- needle and thread
- glue gun

Click the photo to view a bigger version of the image.

Step 1. Take your 2.5 inches strip of fabric.
Step 2. Fold your fabric into 1.5 inch wide rectangles. You can get around 8 folds using the a 12 inch length of fabric
Step 3. Cut the folded fabric into a petal shape. I didn't use a pattern. You should get around 8 separate petals.
Step 4. Singe the edges of each petal. Make sure that the fabric curls toward the wrong side of the fabric.

Repeat Steps 1 - 4 using the 1.5 inch strip of fabric. After this, you should have a stack of big petal shapes and small petal shapes.

Step 5. Take one of the bigger petals and sew a gathering stitch at the bottom. Then take another petal and do this for all big petals until you have around 7 or 8 petals stitched (I used 7 for mine.. but after I finished, I think I would have preferred it with 8).
Step 6. Pull the thread to gather petals and then tie both ends of the thread together to form a flower.
Step 7. Repeat Steps 5 and 6 for the smaller petals. Glue the small flower on top of the bigger flower using hot glue and then attach the button to the center.
Step 8. Attach the felt circle to the back of the bigger flower using hot glue.

And you're done :) You can attach a pin or a clip at the back. Since my sister will be using this for her hair, I used a clip. No picture of her wearing it yet because I am just sending it to her today.

I hope you all had a great weekend! And now... it's the start of a brand new (and potentially tiring) week for me.

I linked up to the following link parties:

Thursday, February 17, 2011

Shoe Refashion - Espadrilles

I got these espadrilles from our Valentine Fair last Monday.


One of my office mates was selling these. I bought them so I can do a little shoe decorating :) See, these are made of light weight cloth so I was thinking that it will be easy to pin small brooches to decorate it.

When I got home... I got to work.

With small denim corsages.
I made 2 denim corsages that were around 2.5 inches in diameter. Each had a pin at the back which I used to attach the corsages to the shoe.

With red leather bows :) I love this one!
I saw a tutorial and printable patterns for these bows from Leafy Treetop Spot yesterday. I didn't use the templates though because I had to customize the size. The template gave me an idea of how each piece should look though, so that was a big help when I free-handed mine. Each of my bows has 2 pins at the back... one at each end so that they will be more stable when attached to the shoe.

I initially thought about using Velcro instead of pins but that means permanently attaching one part of the Velcro to the shoe, and I still want to be able to use the shoe as it is, plain without any decor.


I linked up to the following link parties (aren't link parties fun?? I get a lot of ideas from other amazing projects posted there.):
Blue Cricket Design | Between You and Me | Tea Rose Home | Sew Much Ado | Today's Creative Blog | Somewhat Simple
CraftOManiac | Tatertots & Jello | Craft Couture | Sumo's Sweet Stuff  | Keeping it Simple | Sew Can Do | Not JUST A Housewife | It's So Very Cheri |  The Girl Creative | Sugar & Spice at Seven Thirty Three

Wednesday, February 16, 2011

Andrea's Baby Board Book

My baby girl Andrea is into babies recently. She likes watching babies on TV... she likes looking at baby pictures... and she gets all giggly and happy when she sees one around. For the past few weeks, I collected all the birth announcements and first birthday invitations we have at the house and gave them to her to play with. It has become her evening ritual to grab the stack of photos and look at them before bed time. Since the cards and pictures were getting all wrinkled and torn... I decided to put them all in a book that's safe for Andrea to play with. So I made her a board book using cardboard and felt.

For this project I used:

1) a stack of baby pictures: birth announcements, invitations, pictures
2) 5 pieces of illustration board, cut into 6" x 6" squares.
3) 10 pieces of felt in different colors cut into approximately 7" x 7.5"
The felt has to be bigger than your cardboard for seam allowance and one side need to have a wider allowance.
4) Glue gun
5) sewing machine
6) thread
7) different pieces of trim/items you can use to decorate the pages.

The first step is to arrange the felt squares into how I wanted the colors arranged from cover page to the back page. Step 2... decorate each page.It's like scrap booking (which I'm not very good at). Here's the thing... the first few pages I made were nice... I had several ideas. But for the last pages.. I kinda ran out of ideas so I just glued the pictures and glued a few items... I will probably add more to those pages when I find time.  Make sure to put a wider allowance on one side... this is where each page will be glued to the other pages.

After each page is decorated... put 2 pieces of felt squares together and sew 3 sides together. Slip the cardboard on the open side and then sew shut. You should have 5 pieces of cardboard pages covered in felt. Using the glue gun, attach each page to each where the allowance is wider. Since some of the stuff I glued on some pages were bulky... I had to insert a thin strip of cardboard between each page.

Here's my finished book:
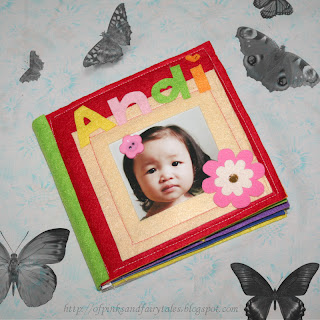

The cover :)

Page 1 and 2
On Page 1: A disc which my husband got when he opened up a busted hard drive from an old PC, turned into a 'mirror' flower with a butterfly applique.

On Page 2: A picture of Andrea with a felt flower which resembles the flower print on the blanket on the photo.

Page 3 and 4
On Page 3: One of the last pages I decorated... A cutout of a cat (yes, that is a cat!) which I free handed. I used plastic eyes and drew the mouth and whiskers.

On Page 4: A picture from cousin Skylar's birth announcement, decorated with felt hearts.

Page 5 and 6
On Page 5, a picture from a friend's daughter's baptism invitation. This is the part where I ran out of ideas... I just glued one flower-shaped button to give Andrea something to play with on this page. I plan to add more to this page soon.

On Page 6, a picture of cousin Rizal from his birth announcement card, decorated with polka dots which match part of the color scheme of the card.

Page 7 and 8
On Page 7, a picture of cousin Caleb on his first birthday invite. I glued 3 charms shaped like little boys.

On Page 8, 2 pockets sewn onto the felt each pocket contains a picture of Andrea as a little baby attached to cardboard and secured with ribbons glued to the inside of the pocket(so she can't pull them out), a felt caterpillar with plastic eyes, and a felt flower.
Here's a closer look at the photo inside the pocket... she was so small then! Only a few days old

Andrea loves playing with her new book and the pictures will last a little longer since they won't get wrinkled every time she grabs them.

Tuesday, February 15, 2011

Valentine Fair and more fabric flowers I made

So yesterday, I mentioned that we had a Valentine Fair at the office. Employees registered for a booth (for free!) and offered items for sale. For each item you buy at a booth, you get a stamp... collect 5 stamps and you can claim a prize at the Human Resources booth. And this is what I got...

I wanted the big stuffed animal for Andrea but it was all gone by the time I was called to pick my prize. Oh well... she likes these cookies anyway.

Some of my former team mates registered for a booth and I put some of my items there for sale:

Singed flowers in beige and pink... the beige flower was the first of my items to go.
These flowers can be used as a clip and as a brooch.

I learned how to make these folded flowers from this tutorial last week. I love them!

In another color. These flowers can be used as brooches and bag charms.
See? The bag charm clasp is removable, so you can use the flower as a brooch.

This one... I didn't offer for sale. I kept it for me! :)
I also made a couple of these denim brooches.

All of my items were packaged in these boxes.
Out of the 8 items I put up for sale... I was only able to sell 2 :) Anyway, I was able to buy a little something for me from our booth as well... something I'm very excited about. I still need to work on it but I'm excited to see how it would turn out. I'll share pictures of this new project when I'm done.


NOTE: By the way, my husband and I don't really celebrate Valentine's Day so no story to tell about that. He used to give me flowers... but I don't really like flowers, I don't know what to do with them to be honest. So now, he just gives me chocolates which I love and that's about it :)

I linked up some of these flowers to the following link parties:


Monday, February 14, 2011

Happy Valentine's Day!

Happy Valentine's Day!

I'm not much for celebrating Valentine's Day (since it's a working day... I don't get any holiday vibes from it). But since I have a little girl I love taking pictures of... and since I made matching shirts for her and my niece...

There's my happy little girl! My niece just woke up so she wasn't in the mood.
For Andrea's gift to her cousin Helaena... I took 3 chocolate-covered cookies, tied it with a ribbon and topped it off with a heart clip I made.

I also made a matching clip for Andrea:


We had to celebrate yesterday (Feb 13) since Valentine's Day is a Monday (working day for everyone except the 2 little girls). For Andrea's gift to her aunt, grandma and great grandma... nothing too fancy. We just bought them chocolates and I glued red felt hearts on the wrappers (no picture, sorry). I didn't have much time to be creative because I was busy preparing for the Valentine Fair here at the office. I didn't have much time to prepare for the Valentine Fair either though... I'm still sick... and bed ridden from Friday to Saturday. Too bad. Anyway, I'll be posting tomorrow about the items I offered at our Valentine Fair (and we also have a raffle and pick-a-prize... I'm hoping to win a big stuffed animal for Andrea, keeping my fingers crossed!)

I linked up to the following link parties: