With the school year nearing its end here in the Philippines, Andrea and cousin Helaena came home last Friday with an envelope full of their "artworks" from class. When they got home, they scattered everything on the floor and started playing and comparing their work (aaarrggghhh!!!). Helaena had this chick made from a paper plate that her class did a few months back and Andrea wanted one too. So last weekend, I prepared some materials and helped Andrea make one of her own.
I didn't have a paper plate at home so I used a cardboard which I cut into a circle shape. We used finger paint to paint the cardboard yellow, and glued googly eyes and pieces of corrugated board that I cut into the shapes of wings, feet, beak, and tuft of hair.
The whole process, at least the parts that Andrea got to be part of, took less than 15 minutes and she said she wanted to make more... uh-oh... So while she was taking a bath, I thought quickly of what else we can make and then Timmy came on TV at the Disney channel and lightbulb moment! We can make a sheep. So I prepared another set of materials.
You will need:
- a small paper plate or cardboard cut in the shape of a circle;
- cotton balls;
- glue;
- 1 pair of googly eyes;
- black corrugated board or cardboard cut into the following shapes: 2 feet, 1 head, 2 ears;
- OPTIONAL: white crayon, white finger paint
- OPTIONAL: a book with a picture of a sheep for inspiration
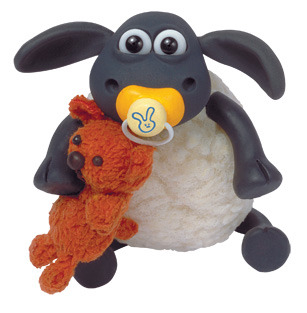
Now the sheep in that Fisherprice book we used, On the Farm, doesn't look like Timmy, but close enough. Just in case you don't know Timmy the lamb, this is what he looks like:
 |
| photo source |
STEP 1: OPTIONAL - Color the cardboard/paper plate with the white paint of crayon. I will explain later why I say this is optional. I made Andrea go through this step anyway... it kept her occupied longer *wink*.
STEP 2: Using glue, stick the cotton balls all over the cardboard/paper plate. This is why Step 1 is optional. you can cover the whole cardboard or paper plate with cotton balls if done properly.
STEP 3: Attach the ears and googly eyes to the head using glue.
STEP 4: Attach the head on top of the cotton balls on the cardboard/paper platen using glue.
STEP 5: Attach the legs at the back of the cardboard/paper plate.
And you get something like this:
I had to help Andrea position the parts that need to be attached. I will apply the glue to show here where each piece will go and then ask her to attach it. But she glued all the cotton balls to the cardboard all by herself. Proud mommy moment.
Can't wait to try other crafts with her this summer vacation!


1 comment:
Ang galing ni Andi! Clap! Clap! Clap! So next time d ako magtataka baka si Andi na mag-take over ng blog mo haha
Post a Comment